
|
©Copyright 1993-2002 The L. W. Ramsey Agency 1-800-473-0157 |
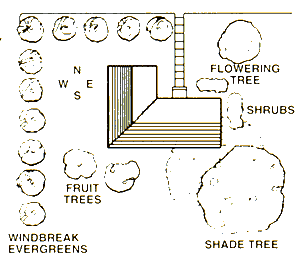
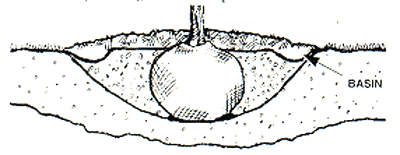
It’s Fun To Plant There is no more satisfying experience than to plant trees, shrubs, and flowers and to care for them until they become beautiful growing things. It is not difficult to give plants the proper start if you just follow the directions in this website. Choosing The Right Location Top of Page Theoretically, you should have a landscape plan on paper, or at least in mind, before you pick out your plants. Bring home the plants and they will force you to develop a plan. Picture your tiny tree at full size. Be sure it doesn’t interfere with overhead lines and that it will frame rather than block any views you favor. The success of any planting depends on choosing the right location of each plant. You should know, ask, or have a label that says whether each kind needs sun, shade, or some of each. If not, check a garden book or catalog or call your cooperative extension service for specific advice. In most locations, evergreens are best planted on the north and west of a house or property as windbreaks. Deciduous trees on the south will give shade in summer and then lose their leaves to let in the welcome winter sun. Spacing the PlantTop of Page Many people make the mistake of planting too close, especially with trees and shrubs that come so small and grow so large. This can result in stunted growth, misshapen plants, extra pruning, poor air circulation, shade in the wrong place, and trees that are dangerous instead of delightful. Plant dwarf fruit and small flowering trees at least 8 to 10 feet from buildings or from other small trees. Place most foundation shrubs 3 to 4 feet from the house and beyond the drip line of the roof or nature won’t help with the watering. Large trees with spreading branches need a diameter of 35 to 65 feet for full development. They will mesh with other trees as they do in a forest, but a house or building offers solid obstruction, so plant accordingly. For very narrow areas, get columnar trees or varieties. Rose bushes can go from 2 to 6′ feet apart depending upon the type and the region of the country. Annuals and perennials should go from 6 inches to 3 feet apart, depending on how large they are going to grow. The closer you plant ivy and vinca, the sooner they will form a solid carpet. If time and money are scarce, plant a small area at a time and expand to new areas as plants multiply. Location and Ground Preparation Top of Page Poor drainage can be a major cause of weak growth in new plants. Avoid planting in places where water collects and stands after rainfall. Make sure the location meets the sunlight needs of the plants you want to grow. Prepare soil for planting flowers and vegetable beds by deep spading or roto-tilling. Shrubs and trees just need well-dug holes in the sod; but for good growth, the soil must be kept spaded two or three feet around the plant and this area kept cultivated or mulched. Planting in Heavy SoilTop of Page In some areas with heavy clay soil and poor drainage, experts recommend that plants be set higher than the soil level. Check drainage by filling the empty hole with water. If it takes more than an hour to drain, you have a drainage problem. Try breaking up the hard pan clay at the bottom of the hole and see if drainage improves. If another location with better drainage isn’t feasible, dig the hole wider than normal and set the plant with about a fourth of the root hall above ground level and mound soil around this. Planting in Sandy SoilsTop of Page Dig the hole at least a few inches deeper and add humus so it will hold more moisture longer. Add as much as part of organic matter to 2 parts of original soil. Use only decomposed material in the hole. Add enough of this soil mix to the hole to be able to set the plant just above its original depth as grown in the nursery. If there is any question, set the plant higher, not deeper, since the soil may settle. Digging the HoleTop of Page Do not skimp on this job. An old saying was “better a $5 plant in a $50 hole than vice versa.” But when this wisdom was carried too far, tree roots refused to leave some comfortable holes and just encircled the trunk until the tree died. So now we settle for a hole with just good enough soil to ease the transition from nearly perfect container soil to less than perfect garden soil. Experts now agree that a saucer-shaped hole is superior in any soil since 90% of a tree’s root system will develop in the top 6″-12″. A saucer-shaped hole allows for more expedient accommodation of these vital uppermost roots. Planting Balled & Burlapped TreesTop of Page
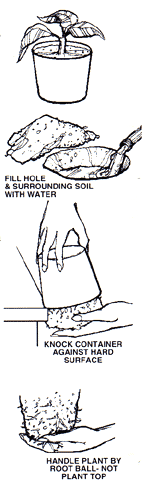
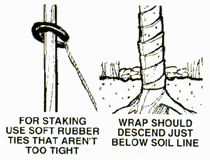
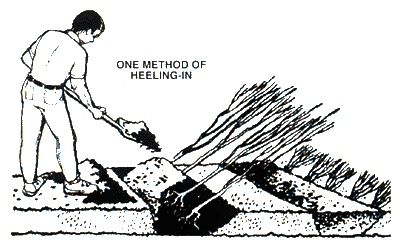
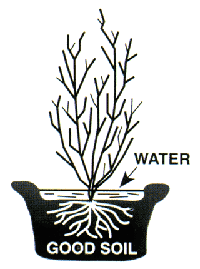
Add backfill soil gradually and firm gently to assure good root contact. Either throughout the process or when the hole is almost level with the soil line, water slowly but well, even if it is raining, until the soil in the hole has the consistency of beef stew. The water will help the soil to settle and eliminate air pockets. After the water is absorbed, finish filling and slightly mound up with more soil to cover all roots and so that the new soil level is about an inch above that of the surrounding area. Staking and WrappingTop of Page At one time nurseries required staking but experts then discovered that staking coddled the tree and stifled its natural development of strength. So if your plant seems sturdy and grows upright without staking, all the better. However, if you live where there are constant high winds or your tree is over 8 feet tall, you should stake the plants. Use soft rubber ties that avoid girdling of the tree and allow enough movement to develop stem wood. Pound stakes flush with the ground. Wrapping may not be necessary but has several benefits in some situations, especially to prevent sunscald. It also limits damage from insects, cats, children, rodents, and mowers. Wrap in overlapping circles. Remove the wrap in the spring after the first growing season and winter. Watering PlantsTop of Page Lack of enough water during the first growing season is a major cause of plant loss. The limited root system on these plants makes them highly susceptible to dry weather damage. Supplemental water is absolutely necessary. Wet the soil enough to soak through to the base of the root system at each watering. Water the plant twice a week during hot weather unless there is at least one inch of rainfall per week or 10-days. Handling Bare Root Stock On ArrivalTop of Page Soak the entire plant in water for a few hours but no more than 24 hours or at least cover. If possible, plant at once when shipment is received. It is best to unpack the material sprinkle tops and all with water and cover the roots with damp packing, sacks or canvas. If the weather is too cold for planting, put the box or bundle in a cool but frost proof place. If the weather is warm and you are not ready to plant, heel the stock in. Heeling In Bare-Root StockTop of Page
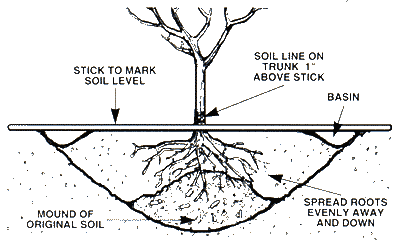
Temporarily plant your trees in a place where they will have protection from the sun and wind, so their development will not be retarded. All packing material and grass that might harbor mice should be removed. Spread out roots and fill in with pulverized earth rather firmly over them. Keep moist. Planting Bare Root Trees and ShrubsTop of Page Dig a saucer-shaped hole at least twice as wide as the spread of bare roots. You may want to make a mound of good soil in the center of the hole. Carry plants to the garden in the bucket of water. Then remove the plant from the water and prune off any broken, twisted, or discolored roots. Put a stick across the hole to mark the soil level. Hold the plant in the planting hole with one hand so that the soil me on the trunk or stem is about an inch above the stick. This line is usually
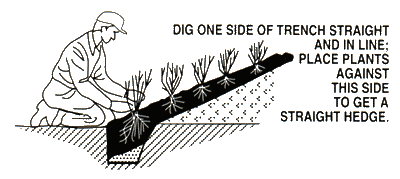
indicated by a change in color or texture on the bark. With the other hand, spread the roots evenly away and down so they will not be crowded. Fill soil in carefully around the roots without letting the trunk level sink. Then follow the instructions for the balled and burlapped and container plants. PRUNING TREES AND SHRUBSTop of Page General PruningTop of Page Fruit TreesTop of Page Dwarf Fruit TreesTop of Page ShrubsTop of Page HEDGES Plant small shrubs which are to form a hedge less than 2 feet in height 10 to 12 inches apart on center; medium-sized bushes 12 to 18 inches apart on centers. Set tall shrubs or trees for high hedges 2 to 4 feet apart. For the latter, it is often more practical to dig individual holes than to set by the trench method. Set hedges a trifle lower than they were in the nursery to get dense growth at the bottom. Prune tops back 6 to 12 inches above the ground.
Each spring the hedge can be trimmed back to the desired height and width. Frequent trimming during early summer will make the hedge grow dense. Trim both the sides and the top, or else the hedge will grow wider at the top and become open at the bottom. How to Plant StrawberriesTop of Page
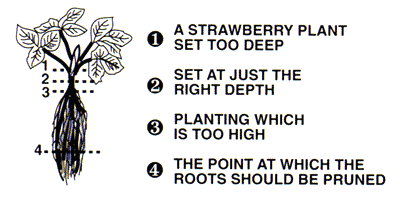
Matted Row: Roto-till or spade land deeply before planting. Plant by pushing spade into ground to its full depth in spot where plant is to be. Press it to one side, insert roots and spread them out in a fan shape and hanging down to their full length. Set plant with crown at surface or a little below. (See point #2 in illustration above.) Remove spade and press dirt against roots. Extremely long roots may be cut back for convenience in planting. Carry plants in a pail of water. Water each plant after planting. Planting Bush FruitsTop of Page Currants and Gooseberries Red & Black Raspberries and BlackberriesTop of Page How to Plant BlueberriesTop of Page How to Plant Broad-Leaved Evergreens, How to Plant RhubarbTop of Page How to Plant Asparagus (Green)Top of Page GrapesTop of Page
How To Plant AnnualsTop of Page
How To Plant PerennialsTop of Page
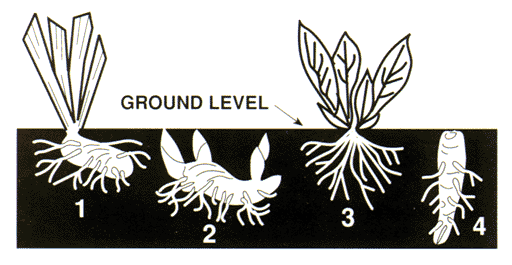
The soil should be well worked in specially prepared beds 2 to 2-1/2 feet deep with good drainage. Plant food and plenty of humus are necessary ingredients for successful perennial flower growing. Most perennials respond best if planted in a sunny location. The average planting distance for perennials is 1 foot apart. Vigorous growers like peonies and mallows require as much as 3 feet. # 1 Plants (see illustration) such as Iris should be planted with the roots below the surface of the ground and the rhizome just on the surface. # 2 Plants such as Peonies should be planted with the tips of the buds just below the surface of the ground (about 1 inch). Peonies will not bloom well if planted too deeply or if deprived of ample plant food. # 3 plants on which the leaves spring from a crown should be planted with this crown just at the dirt line. # 4 plants with a fleshy root such as Hollyhocks should be planted with the tap root straight down and the bud just below the surface of the dirt. In all planting, spread the roots out naturally and do not crowd. Bring the soil in contact with all roots and press firmly. Water thoroughly. Most winter injury to herbaceous perennials is caused by alternate freezing and thawing of the soil. A mulch of salt hay, straw or leaves applied to the ground after it is frozen will prevent injury to most perennials. Plants that maintain a crown of green leaves through the winter, such as Shasta Daisies, will need special protection in the way of mulch, which will not pack down and cause the leaves to rot. Some plants, such as chrysanthemums, will benefit from a mulch of sand.
Many perennials make rapid growth and need dividing every few seasons. Large clumps produce mediocre blooms because the inside roots are starved and crowded. Perennials may be divided and reset in either early fall or spring. Plant Fall Bulbs for Spring Flowers Top of Page
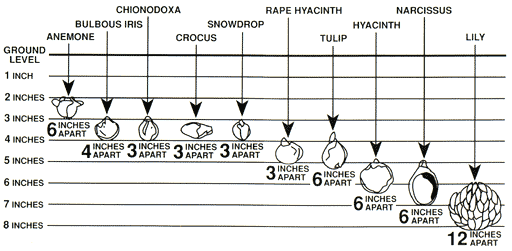
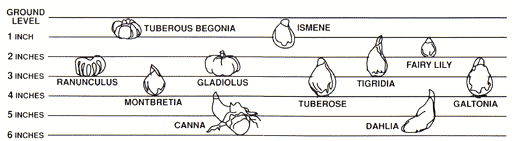
How to Plant LiliesTop of Page The most desirable soil for lilies is a loose sandy loam, which should be enriched by top dressing of manure and should be well drained. Plant lilies in groups about 4 to 6 inches deep for base rooting types, 5 to 8 inches for stem rooting. Tip bulbs on sides slightly and surround with a few handfuls of sand to assure sharp drainage around each bulb. They may be left in the ground year to year. How to Plant Summer Flowering Bulbs and Tubers Top of Page
How To Plant Roses Top of Page Select a site that receives at least 6 hours of sunlight each day and drains well. Don’t plant roses too close to trees or shrubs whose roots will compete for soil nutrients. A site with good air circulation helps prevent disease. When the soil is poor, dig out the beds to a depth of 18 inches to 2 feet. Mix the soil with 25% peat moss and about 10% compost or well-rotted manure. Rose plants purchased in containers should be removed-following procedure recommended by grower for type of container used-and set in ample holes to proper depth. Fill in with soil and water generously to eliminate air pockets. To plant dormant bare root roses, dig holes large enough to accommodate roots without crowding, and deep enough to set them at the proper height.
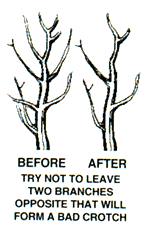
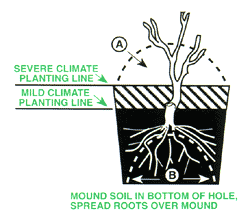
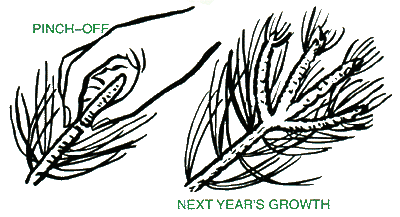
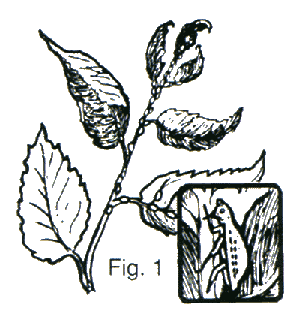
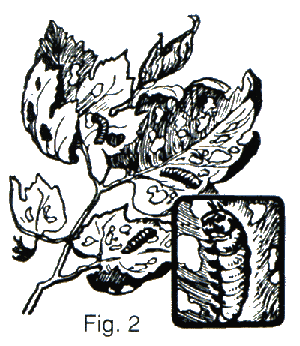
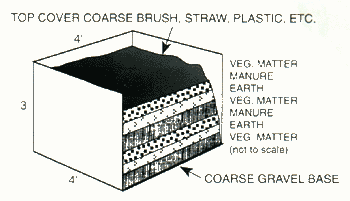
The lower part of the bud union or crown of the plant should be level with the surface of the ground in mild climates 2 to 3 inches below in severe climates. Spread the roots so they point downward at a forty-five degree angle. Build a mound or cone of soil in the hole under the base of the bush to help in spreading the roots. Cover the roots with loose soil, working it well underneath. Fill the hole 3/4 full and tamp soil down firmly; water well. Fill hole and mound over top 6 inches until growth starts to prevent drying out of canes. Winter protection of roses in severe climates should consist of an 8-inch earth mound (see “A” on the illustration) over the base of the bush. In milder climates a 3-inch earth protection is sufficient. Rose foliage is a vital part of the rose plant. Do not cut it lavishly through the growing season. Spray or dust regularly. Roses like cool roots. A 3-inch mulch of peat moss or other suitable material keeps soil cool, conserves moisture and prevents weed growth. General Care after PlantingTop of Page Pruning Trees and Shrubs: Established plants are pruned only for cultural or maintenance purposes. Improving structure is of primary importance. Work for uniform spacing of main stems and branches; thin out weak growth; eliminate weak crotches; raise the head of a tree gradually by removing the lowest branches, starting at least 2 years after planting. Keep shrubs shapely and restricted by heading-in young growth. Drastic pruning of shrubs should be done only by removing old wood to ground. Prune roses in spring. Pruning Narrow-Leaved EvergreensTop of Page Narrow-leaved evergreens may be kept thick and shapely and their growth suitably restricted by cutting back the ends of the branches. Pinching back a part of the tender, new growth is the simplest and usual method. Maintaining a neat evergreen hedge requires cutting back whenever the growth becomes irregular. Tip-prune the branches just before new growth starts to keep shrubs thick. Head back longer growth if necessary. Removal of faded flower clusters from Rhododendron, Laurels and Andromedas to prevent seed formation is usually adequate pruning for them. CultivationTop of Page MulchingTop of Page WateringTop of Page FertilizingTop of Page Small fruits and shrubs respond to the same treatment. Roses benefit from regular applications of fertilizer through the Spring and Summer. Foliar and liquid feeding methods are effective. Insect PestsTop of Page Remedies for Sucking InsectsTop of Page Hard-bodied sap-sucking insects, like scale which sucks the juice from the twigs or branches rid trunk, are best controlled by some dormant pray, such as lime sulfur solution or miscible oil. Common Aphids – an insect that sucks out the vital juices of the plants. It is found on the young growth and on the under-side of the leaves. The leaves usually wither and curl on the infested part. Remedies for Chewing InsectsTop of Page Plant DiseasesTop of Page Starting A Compost Pile (one method)Top of Page It is possible to use your yard waste (leaves and grass clippings) to make a compost pile. Properly maintained, such piles rapidly convert vegetable and animal matter into a beneficial fertilizer and soil conditioner known as humus. Autumn is a convenient time to start, because of available material from the summer season.
AnnualsTop of Page
Getting StartedTop of Page
Some facts may vary by region. Please check with your lawn and garden dealer if concerned about possible variations. |